Auto Heat Press vs Manual Clamshell for Home Apparel Shops
Auto heat press vs manual clamshell—what “auto” really means for drawer cycles and timers, how pressure setup and footprint differ, approximate public price bands, and when an HTVRONT-style auto may be worth considering over a Fancierstudio or PowerPress manual.
Once you decide a full 15×15 heat press belongs in your home apparel shop, the next fork is usually auto heat press vs manual clamshell. Marketplace listings blur the words—“automatic timer,” “auto-open,” “drawer,” “smart press”—so this guide defines what “auto” actually means for beginners, then compares pressure setup, learning considerations, speed, footprint, and approximate public price bands.
This comparison is written for home apparel shops shipping custom tees and hoodies (Etsy or similar)—not commercial pneumatic floors. We use published form factors, common studio workflows, and approximate 2025–2026 street-price bands from brand and major-marketplace listings.
We did not run private adhesion labs or invent “hands-on” sales rankings. Tradeoffs below follow public specs and known operator differences between drawer/auto cycles and hand-lever clamshells. Always verify the live listing, voltage, warranty, and your material charts before you buy.
Quick comparison
| Factor | Auto / drawer-style | Manual clamshell |
|---|---|---|
| What “auto” usually means | Drawer or slide-out load + machine-driven press/release and timer cycle | You close a hinged jaw with a hand lever; timer is usually digital but pressure is dial/feel |
| Pressure setup | Machine can repeat a configured, machine-driven cycle (exact pressure features vary by SKU) | Operator sets dial/feel and closes the lever each cycle |
| Learning curve | Still learn time/temp/peel; less operator lever work once the cycle is configured (PressDesk workflow analysis—not a measured outcome) | More operator practice on dial setup and lever closure; recommend scrap/test blanks before paid work |
| Speed | Fast once loaded; cycle handles hold time | Fast for flat tees once dialed; you own every close/open |
| Footprint | Often deeper (drawer travel)—measure clearance | Usually compact depth; heat stays above the lower platen |
| Approx. street price* | Often ~$250–$350+ (entry auto → Auto 2 class) | Often ~$175–$210 for common 15×15 manual listings |
| Best home-shop fit | Preference for repeated machine-driven cycles, matching batches, or drawer-style loading layout | Budget-first, flat apparel, tight cash, comfort with operator pressure setup |
*Approximate bands from brand and major-retailer listings commonly observed around 2025–2026. Promo kits and refurbished units move the needle—confirm before checkout.
-

Auto / drawer
-

Manual clamshell
Who this guide is for
You’re in the right place if you:
- Already know you need a full 15×15—not just a handheld EasyPress—for paid apparel
- Are deciding auto heat press vs manual clamshell for a spare-room, garage, or apartment studio
- Want clear tradeoffs on pressure setup, loading layout, footprint, and price—not unboxing hype
- Press HTV, purchased DTF transfers, or both on cotton/blend garments
Look elsewhere (for now) if you:
- Only need a handheld tool for samples (see EasyPress vs full heat press)
- Are shopping pneumatic commercial press floors
- Need mug/hat specialty attachment deep dives
What “auto” actually means (and what it doesn’t)
In home-shop marketing, “auto” rarely means a factory pneumatic. For apparel beginners it usually means one or more of:
- Drawer / slide-out loading — pull the lower platen toward you, dress the shirt, push in, then start a cycle. HTVRONT-style auto presses are the common reference class.
- Machine-driven press and release — the unit applies and releases pressure on a timer so you are not holding a lever for the full dwell.
- Digital timer / presets — time (and often temperature) live on a control panel; some models add auto-open at the end of the cycle.
- Optional pressure adjustability — entry autos may fix or limit pressure; “Auto 2”-class listings often advertise more adjustable pressure or height. Read the exact SKU.
“Auto” is not one standardized feature set. Not every auto has a drawer, adjustable pressure, auto-determined pressure, the same clearance height, or the same timer behavior. The exact SKU controls—compare the live listing, not the marketing word alone.
What auto does not automatically mean: commercial duty cycles, unlimited max temperature for every specialty film, or zero need to follow material charts. Wrong time, temperature, or peel still fails on an auto press.
Manual clamshell (the baseline)
A manual clamshell opens like a jaw on a rear hinge. You align on the lower platen, pull a lever to close, and set pressure with a dial (or equivalent). Common home-shop examples in public shortlists include Fancierstudio FS15×15-class and PowerPress Industrial PW15×15-class machines. Timers are digital on most modern units; the “manual” part is the lever and pressure feel.
Auto / drawer often preferred for
- Repeating a configured machine-driven press/release cycle
- Drawer-style loading: work surface slides away from under the hot upper platen
- Less lever technique once the cycle is set (workflow preference—not a measured outcome)
Manual clamshell often preferred for
- Lower typical entry price
- More compact depth on many tables
- Simple mechanics once dials are learned
Pressure setup and consistency
Adhesion outcomes depend on transfer instructions, time, temperature, pressure, coverage, garment type, and equipment behavior. After time and temperature are set, how pressure is applied is one place auto heat press vs manual differs for sellers—without implying a proven remake or return rate for either class.
- Manual: Charts often call for light, medium, or firm. The operator sets the dial (or equivalent) and closes the lever each cycle. Uneven or incorrect pressure is a potential workflow risk for edge adhesion or garment marks—verify with scrap tests and wash checks rather than assuming a failure mode.
- Auto / drawer: Many models can repeat a configured, machine-driven press/release cycle so the operator is not holding a lever for the full dwell. That does not replace correct settings, and pressure features (fixed vs adjustable, range, accuracy) vary by SKU. Prefer the exact listing over “auto means perfect pressure.”
Learning curve and loading layout
Manual clamshell: Compact and familiar. An open clamshell leaves the hot upper platen above the lower work area while you dress the garment. Beginners should slow down with thick garments or fiddly transfers. Practice on scrap/test blanks before paid work so dial setup and lever closure feel repeatable.
Auto / drawer: On drawer-style models, the drawer slides the work surface away from under the hot upper platen for loading, then returns for the cycle. That is a physical layout difference—not a proven lower injury or burn rate. Readers should evaluate which loading posture they prefer. You still respect heat on either design.
Neither design forgives rushing. Auto can reduce how much lever technique you need once a cycle is configured (PressDesk workflow analysis—not a measured learning-curve outcome). It does not make transfers magic.
Speed, workflow, and footprint
Speed
Neither class is inherently “slow” for typical home Etsy volume. The differences are workflow shape:
- Manual: Often quick once pressure is dialed—close, wait for the timer, open, peel. Whether the lever is your bottleneck depends on your shop—evaluate weeding, packaging, transfer prep, and press time against your own order mix.
- Auto: Loading and unloading a drawer (when the SKU has one) adds a motion; the machine owns the hold on a machine-driven cycle. Hands-free dwell can help when you stage the next shirt or check a packing slip.
PressDesk planning heuristic: for sessions on the order of roughly 15–20 shirts, many home shops choose on pressure-setup preference, loading layout, and budget—not raw cycle-time marketing copy. Actual benefit depends on cycle design, operator, prep, order mix, and other steps.
Footprint
- Manual clamshell: Usually the smaller depth footprint. Needs a sturdy dedicated table and overhead clearance for the open jaw.
- Auto / drawer: Plan for drawer travel in front of the machine plus cable and ventilation space. Measure the table before you buy; a dining table that “fits the box” may not fit an open drawer.
Swing-away presses are a third design class when open-platen alignment matters more than drawer automation—see Clamshell vs Swing-Away Heat Press for the mechanism deep dive, then the 15×15 beginner guide for shortlists.
Approximate price bands (public listings)
These are labeled approximate bands from brand sites and major marketplaces commonly observed around 2025–2026. They are not quotes and they move with promos, kits, and refurbished stock.
| Class | Example references | Approx. street band* |
|---|---|---|
| Budget manual clamshell | Fancierstudio FS15×15 class | Often $175–$190 |
| Mid manual clamshell | PowerPress PW15×15 class | Often ~$200 |
| Entry auto / drawer | HTVRONT Auto Heat Press 15×15 class | Often $250–$300 new (refurb lower) |
| Auto + more adjustability | HTVRONT Auto Heat Press 2 class | Often ~$350+ |
*Confirm live price, warranty, listed max temperature, and whether the SKU is flat-only or a mug/hat combo kit. Combo kits inflate totals—buy flat-only if apparel is the business. For HTVRONT Auto Heat Press 2 specifically (not all autos), manufacturer materials commonly list 15×15, up to ~410°F, pressure ~20–80 kg, and height ~4.5 cm / 1.77 in—verify the live SKU.
When an HTVRONT-style auto makes sense
Choose auto / drawer when several of these are true:
- You prefer a machine-driven press/release cycle once configured, rather than operator lever closure every shirt
- You want a drawer-style loading layout (work surface slides away from under the hot upper platen)—a preference, not a proven safety outcome
- You run matching multi-shirt batches (HTV, purchased DTF, or both) and want the same configured cycle repeated—DTF itself does not require auto
- You have evaluated whether remakes or adhesion issues in your shop could justify the current price premium over the manual you are considering (we do not invent a universal remake-cost payback)
- You will pay roughly $250–$350+ (approximate, volatile) for that workflow class
When a Fancierstudio / PowerPress manual clamshell makes sense
Choose manual clamshell when:
- Budget and compact depth dominate the decision
- Product mix is mostly flat tees with straightforward placements
- You are willing to practice pressure dials on scrap blanks before scaling volume
- You may later add a second press (auto or swing-away) rather than overspending on day one
Manual is not “worse”—it is more operator-dependent. A manual press can remain a viable long-term tool when it meets the operator’s pressure-control, platen-size, workflow, and production needs. The failure mode is buying the cheapest listing, skipping scrap/pressure tests, then assigning cause to the brand or category before systematic troubleshooting.
DTF and HTV notes for this gear choice
Method choice and press class interact. For the deeper method comparison, see DTF vs HTV for cotton Etsy tees. The gear-relevant short version: For DTF-specific auto vs manual capability fit, see Best Heat Press for DTF Transfers.
- Simple HTV (one color, small logo): Either class can work when it meets the transfer maker’s instructions; a dialed manual is often enough.
- Layered or large HTV: Weeding labor is already expensive. If you struggle to match firmness shirt to shirt, a machine-driven cycle may be an attractive workflow preference—not a guarantee of fewer remakes.
- Purchased DTF film: Both manual and auto are OK when they meet the transfer instructions (time, temp, pressure, peel, coverage). Auto may attract sellers who want repeated machine-driven cycles on matching batches—that is a workflow preference, not a DTF requirement. Verify with scrap and wash tests either way.
- Hybrid shops: Some sellers keep one class for overflow and another for matching batches—or the reverse—based on which machine they trust for their mix, not because DTF “belongs” on auto.
Upgrade path
- Validating demand / tiny samples only — stay on a handheld / EasyPress path first (upgrade timing).
- First paid 15×15 — manual clamshell or entry auto based on the decision tree below.
- Steady weekly volume / thicker garments / pressure limits — Auto 2-class, swing-away, or a second specialized press—not another ultra-cheap mystery clamshell.
- True production floor — pneumatic commercial gear (out of scope for this home-shop comparison).
Decision tree
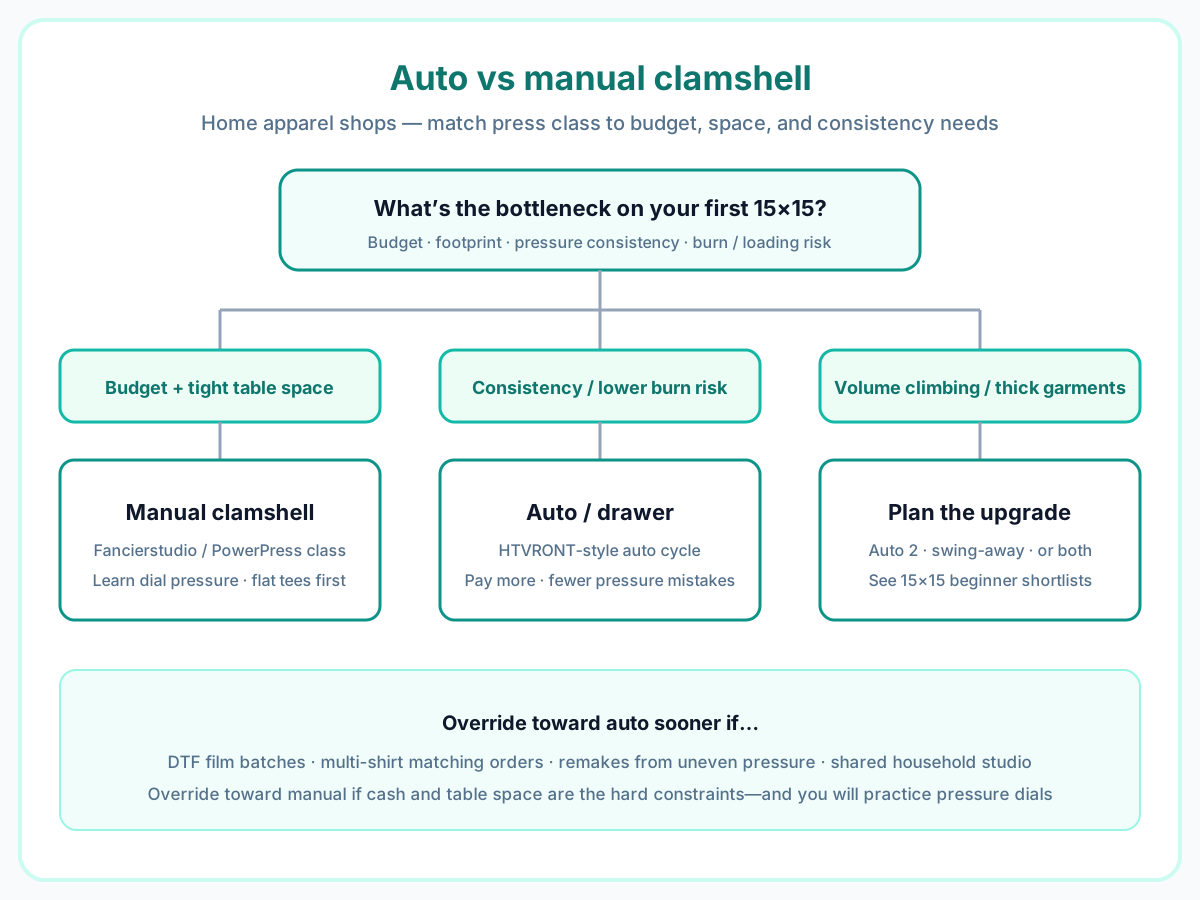
What’s the bottleneck on your first 15×15?
-
Budget + tight table depth
Manual clamshell — Fancierstudio / PowerPress class; learn dial pressure on scrap; flat tees first.
-
Machine-driven cycles / drawer loading layout
Auto / drawer — HTVRONT-style cycle when the SKU matches; pay the current premium for a configured machine-driven press/release—not a proven injury-rate win.
-
Volume climbing / thick garments / pressure limits
Plan the upgrade — Auto 2, swing-away, or both. Use the 15×15 shortlists.
Rule of thumb: Override toward auto when you prefer repeated machine-driven cycles on matching multi-shirt orders, or a drawer-style loading layout—whether the transfers are HTV, purchased DTF, or both. DTF alone does not require auto. Override toward manual when cash and table depth are the hard constraints—and you will practice dials on scrap before paid work.
Common mistakes
- Assuming “auto” means commercial pneumatic quality — home autos are a convenience/consistency class, not a factory floor
- Assuming every “auto” has the same features — drawer, adjustable pressure, auto-determined pressure, and clearance vary by exact SKU
- Buying a mug/hat combo kit you will never use — paying for bulk and clutter
- Skipping pressure tests on scrap before the first paid batch
- Ignoring listed max temperature versus specialty materials on your roadmap
- Measuring the closed machine but not drawer travel or open-jaw height
- Assigning cause too early — troubleshoot instructions, settings, pressure, coverage, equipment behavior, and compatibility before blaming the brand or category; machines can also be defective or inaccurate
- Upgrading twice on purpose — ultra-cheap manual → slightly better manual → finally auto, instead of one honest decision
- No wash test on new blank + vinyl/transfer stacks before scaling
FAQ
Is an auto heat press worth it for a home shop?
It can be, if matching multi-shirt orders or a preference for machine-driven cycles / drawer-style loading matter more to you than the current price premium over the manual press you are considering (approximate bands move—confirm live prices). Remakes may justify auto only after you evaluate your costs and root causes—we do not invent a universal remake payback. If cash is the hard constraint and you will practice dials on scrap, manual remains rational.
Can a manual clamshell do DTF?
Yes. Both manual and auto are OK when they meet the transfer maker’s instructions. Success depends on correct settings and adequate pressure/coverage—not the word “auto” on the box. Auto may attract for repeated machine-driven cycles on matching batches; that is a workflow preference, not a DTF requirement.
Do I need a swing-away instead of auto or manual?
If open-platen alignment and hoodie dressing are the main pain, swing-away may beat both for your mix. Compare geometries in Clamshell vs Swing-Away Heat Press, then shop shortlists in our 15×15 beginner guide.
Will an auto press fix bad settings?
No. It makes correct settings more repeatable. Wrong time, temperature, or peel still fails.
What about EasyPress?
Different tool class—hand pressure and smaller plates. If you have not committed to a 15×15 yet, start with EasyPress vs full heat press.
Auto vs Auto 2—what’s the difference?
Treat each SKU on its own specs—do not generalize one model to every “auto.” Per HTVRONT’s Auto Heat Press 2 product information (and HTVRONT’s published Auto 2 overview), that model is commonly listed as a 15×15 platen, temperature up to about 410°F (≈210°C), adjustable pressure roughly 20–80 kg, and pressable height about 4.5 cm / 1.77 in. Entry Auto-class machines may differ (for example fixed vs adjustable pressure, different clearance). Always verify the live listing for the exact SKU you buy.
How we chose (method, not lab theater)
PressDesk framed auto heat press vs manual for home apparel shops using: (1) published form factors (drawer/auto cycle vs hand-lever clamshell), (2) pressure-setup and loading-layout differences relevant to spare-room studios (physical differences—not proven injury or remake rates), (3) approximate 2025–2026 street-price bands from public brand/marketplace listings, (4) DTF/HTV workflow fit without treating DTF as auto-required, and (5) upgrade paths that avoid invented “tested in our lab” rankings.
We did not invent private adhesion scores or secret sales data. Specs and prices move—confirm the live listing, warranty, and your material charts before you buy.
Final recommendation
- Tight budget + flat tees + willingness to learn dials: manual clamshell (Fancierstudio / PowerPress class)
- Preference for machine-driven cycles, matching batches, or drawer-style loading: HTVRONT-style auto / drawer (DTF OK on either class when instructions are met)
- Already selling steadily with pressure-feature or garment-thickness limits on your current SKU: evaluate Auto 2 (check manufacturer specs for that model) or swing-away rather than another bare-bones manual
- Still on a handheld: settle EasyPress vs 15×15 first, then return to this fork
For auto heat press vs manual, pick the class that matches your real bottleneck—cash, space, or pressure-setup / loading preference—not the flashiest listing photo. Evaluate your own workflow constraints; we do not claim a universal safety, remake, or payback winner.